Strawberry Bat Amigurumi — Free Crochet Pattern
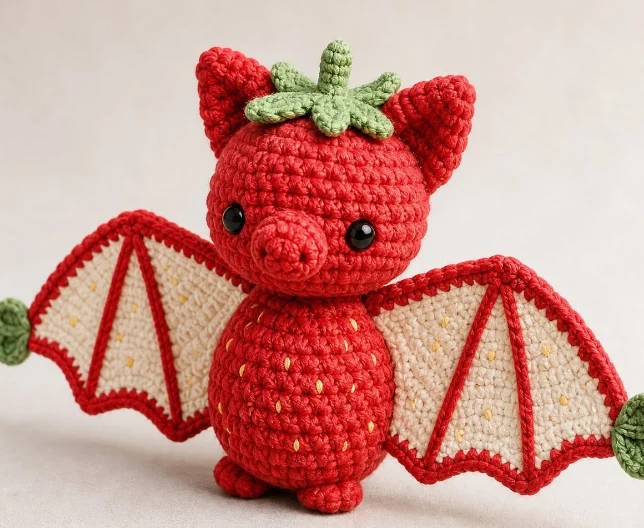
Advanced
For experienced crocheters who enjoy complex shaping, fine detail, and ambitious construction
Weekend Project
A satisfying weekend make — start Friday, finish Sunday, enjoy forever.
Handmade Gift
A beautiful keepsake — free forever. Read online or print at home.
About This Strawberry Bat Amigurumi — Free Crochet Pattern
This Strawberry Bat Amigurumi — Free Crochet Pattern pattern creates a beautifully detailed amigurumi character using a simple construction: continuous spiral rounds of single crochet, shaped with carefully placed increases and invisible decreases. The result is a smooth, rounded three-dimensional form without seams or join ridges.
The pattern is written for Advanced crocheters using Worsted weight yarn on a 3mm hook. The finished Strawberry Bat Amigurumi — Free Crochet Pattern measures approximately ~16 cm tall, ~20 cm wingspan — firm enough to display on a shelf, soft enough to cuddle.
Everything you need is right here: full round-by-round instructions with stitch counts, a complete materials list, all abbreviations explained, step-by-step assembly guide, and a detailed troubleshooting section. You'll finish knowing exactly what you've made and how every stitch works.
This pattern makes an exceptional handmade gift. A crocheted amigurumi carries real hours of care and skill in every stitch — and the people who receive them tend to treasure them forever.
Why You'll Love This Pattern 💛
This pattern takes two beloved amigurumi themes — juicy strawberries and spooky-cute bats — and fuses them into one character that shouldn't work as well as it does. The strawberry-shaped body doubles as the bat's torso, and the calyx on top reads instantly as both a stem and a pair of little ears' backdrop.
The wings are the real showcase here: worked flat in two colours with a picot scalloped edge and hand-embroidered veining, they're genuinely more advanced than a typical amigurumi limb. Finishing them feels like a real accomplishment, not just another round of single crochet.
Every seed is placed by hand with a French knot, which means no two finished pieces look quite identical — a small detail that makes this one worth the extra time.
Switch Things Up 🎨
Swap the red for deep purple or near-black yarn and keep the same construction for a "blackberry bat" instead — the picot-edged wings and calyx work with almost any fruit.
For a spookier finish for Halloween displays, work the wings in solid black with a single red vein line instead of the full picot trim, and skip the yellow seed embroidery entirely.
Want a bigger statement piece? Bulky yarn and a 5mm hook will roughly double the finished size — the stitch counts stay identical, only the scale changes.
Common Mistakes & How to Fix Them 🔧
Make sure you're only sewing along the straight red edge, not the scalloped curve. The scalloped edge needs to stay free so the wing has real dimension and movement.
Keep tension consistent on every ch-3 picot loop — pulling one tighter than the rest is the most common cause of a lopsided scalloped edge. Count stitches between each picot as you go.
Space French knots by eye before stitching any of them — lightly mark planned positions with a pin first, then commit to the yarn once you're happy with the spread.
Pin it in place and view the head from directly above before sewing a single stitch. It should sit centred between the ears, not favouring one side.
Stuff gradually in small amounts as you close each round rather than all at once at the end — this is what keeps the characteristic tapered strawberry silhouette.
Materials Needed for Strawberry Bat Amigurumi — Free Crochet Pattern
🧶Yarn
head, body, ears, wing trim)
(wing membrane contrast)
(small amount, for the calyx)
(small amount, for seed detail)
🪝Tools & Notions
(for nose and whisker details)
sized down for tight, dense amigurumi tension
— Gauge:
20 sc = 4 inches
— Finished Size:
~16 cm tall, ~20 cm wingspan
— Yarn Weight:
Worsted
— Hook:
3mm
— Terms:
US Crochet Terminology
— Cost:
FREE ✓
Crochet Abbreviations
Strawberry Bat Amigurumi — Free Crochet Pattern — Full Pattern
🧶HEAD & BODY (worked as one continuous piece, bottom-up)
🧶EARS (make 2)
🧶WINGS (make 2, worked flat in rows)
🧶FEET (make 2)
🧶CALYX (green leaf top, make 1)
🧶ASSEMBLY
Assembly & Finishing Tips
💡 Working the wings flat
Amigurumi is usually worked in the round, so flat rows can feel unfamiliar. Remember to chain 1 and turn at the end of every single row, and count your turning chain as part of the row width.
💡 Surface slip stitch veining
Work these after the wing is otherwise complete. Insert your hook from front to back, catch the working yarn, and pull through both the fabric and the loop on your hook in one motion, moving in a smooth line toward the scalloped edge.
💡 Getting a clean picot
A picot is just a chain-3 loop closed with a slip stitch back into the same stitch. Keep the chain snug, not tight, so the loop holds its shape instead of pulling flat.
💡 Positioning the wings symmetrically
Fold the body in half with your fingers to find the exact centre line before pinning either wing — small placement differences are very noticeable on a finished piece this size.
⚠️ Important Notes
- Use stitch markers at the start of every round — don't rely on memory to count.
- Work with consistent tension throughout. Gauge swatch before starting if in doubt.
- Fasten off leaving long tails for sewing — at least 30cm for each piece you'll need to attach.
- Pin and check positioning of all pieces before sewing any of them permanently.
Beginner's Guide to Amigurumi 🌱
If this is your first time trying a pattern with flat rows instead of continuous rounds, the biggest adjustment is remembering to chain 1 and turn your work at the end of every row — amigurumi worked in the round never does this, so it's an easy step to forget out of habit.
Picot stitches look intimidating written down but are simple in practice: chain three stitches, then slip stitch back into the same stitch you just came from. That small loop is the whole picot. Practise a few in a row on scrap yarn before working them into the actual wing edge.
Surface slip stitch (used here for the wing veining) is embroidery done with a crochet hook instead of a needle. Work it after the piece is otherwise finished, inserting the hook from front to back along your planned line and pulling loops through in a smooth, even chain across the surface.
You Ask, We Answer ❓
Not really — this one is rated Advanced. The flat-row wing construction, picot edging, and surface embroidery all assume you're already comfortable with standard amigurumi shaping. If you're new to crochet, try one of our Beginner-rated patterns first.
You can, but it changes the character quite a bit — the veining and picots are what make the wings read as "bat wings" rather than plain flat ears. A single row of sc around the wing edge works as a simpler substitute if needed.
Worsted weight with a 3mm hook gives the tight tension shown in the photos. DK weight with a 2.5mm hook produces a smaller, even more detailed version if you enjoy fine work.
Budget 8-10 hours total across the body, ears, both wings, calyx, and assembly. The wings alone typically take the longest given the row-by-row construction and finishing details.
The scalloped edge and shaping described here rely on flat rows to get the fan shape. Working in the round would require re-drafting the whole wing shape, so it isn't a simple substitution.
Yes — you're welcome to sell handmade finished pieces made from this pattern. Please don't resell, redistribute, or claim authorship of the written pattern itself.