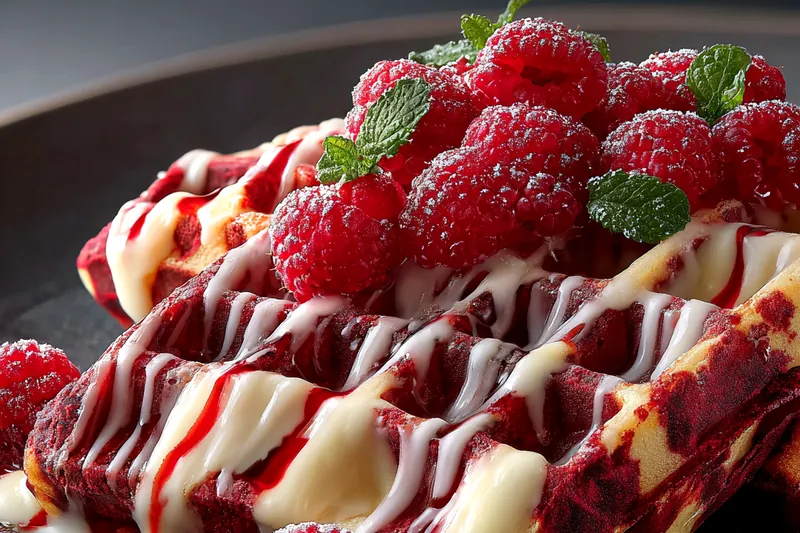
Red Velvet Marble Waffles
Red Velvet Marble Waffles are a fun and delicious twist on traditional waffles. The vibrant red color combined with the rich cocoa flavor makes them an eye-catching and tasty breakfast option. Perfect for special occasions or a weekend treat, these waffles are sure to impress. Serve them with maple syrup or a dusting of powdered sugar for a delightful meal.


Why This Red Velvet Marble Waffles Recipe Works
This recipe works because it combines the classic flavors of red velvet cake with the light and fluffy texture of waffles. The use of buttermilk adds moisture and a slight tang, enhancing the overall flavor. The cream cheese swirl not only adds richness but also creates a beautiful marbled appearance that makes these waffles visually appealing.
The technique of swirling the cream cheese into the batter ensures that every bite has a perfect balance of flavors. Cooking them in a preheated waffle iron allows for a crispy exterior while keeping the inside fluffy. This combination of textures and flavors makes for a breakfast treat that everyone will love.
💡 Professional Tip
For the best results, ensure your waffle iron is fully preheated before adding the batter. This will help achieve a crispy exterior while keeping the inside soft and fluffy. Additionally, do not overmix the batter to maintain the light texture of the waffles.
Frequently Asked Questions
Yes, you can make the waffle batter ahead of time and store it in the refrigerator for up to 24 hours. Just give it a good stir before using it. If you have leftover waffles, they can be stored in the fridge and reheated when ready to serve.
You can substitute each egg with 1/4 cup of unsweetened applesauce or mashed banana for a vegan option. Alternatively, use flaxseed meal mixed with water (1 tablespoon flaxseed meal + 2.5 tablespoons water for each egg) for a similar binding effect.
Waffles are typically done when they are golden brown and steam is no longer escaping from the waffle iron. You can also check for doneness by inserting a toothpick; it should come out clean if the waffles are cooked through.
Yes, you can freeze these waffles! Allow them to cool completely, then place them in an airtight container or freezer bag. They can be stored in the freezer for up to 2 months. To reheat, simply toast them in a toaster or oven until warmed through.
These waffles pair wonderfully with whipped cream, fresh berries, or a drizzle of maple syrup. For an extra treat, consider adding a dollop of cream cheese frosting or a sprinkle of chopped nuts for added texture and flavor.
Red Velvet Marble Waffles can be stored in the refrigerator for up to 3 days. Make sure they are in an airtight container to maintain their freshness. Reheat them in a toaster or microwave before serving.
Absolutely! You can prepare the batter and store it in the fridge for up to 24 hours. You can also cook the waffles ahead of time and reheat them when needed, making this recipe great for busy mornings.
The best way to reheat waffles is in a toaster, which will help restore their crispiness. You can also use an oven set to 350°F for about 10 minutes to warm them through without making them soggy.
Recipe Troubleshooting Guide
Too Dry
Problem: If your waffles turn out dry, it may be because of overmixing the batter or cooking them for too long.
Solution: To prevent this, mix the batter until just combined and keep an eye on the cooking time, removing them from the iron as soon as they are golden brown.
Not Crispy Enough
Problem: Waffles may not be crispy if the iron isn't hot enough or if the batter is too thick.
Solution: Ensure your waffle iron is fully preheated and consider adding a little more buttermilk to thin the batter slightly for better results.
Overcooked
Problem: Overcooked waffles can become too hard and dry.
Prevention: To prevent this, always check the waffles a couple of minutes before the recommended cooking time, adjusting as necessary for your specific waffle iron.
Undercooked Center
Problem: If the center of your waffles is undercooked, they may not have cooked long enough.
Recovery: Try cooking them longer, but keep the iron closed during the entire cooking period to ensure even heat distribution.
Burnt Exterior
Problem: Burnt waffles may indicate that the waffle iron is too hot.
Prevention: Lower the heat setting on your waffle iron or reduce cooking time to avoid burning the outside while leaving the inside undercooked.
Flavor Balance
Too Sweet: If the waffles are too sweet, consider adding a pinch of salt to balance the flavors in future batches.
Too Salty: To fix overly salty waffles, add a bit of sugar or use less salt in your batter next time.
Bland: If the waffles are bland, incorporate more vanilla extract or spices like cinnamon to enhance the flavor.

Essential Ingredients for Red Velvet Marble Waffles
Key ingredients for these waffles include all-purpose flour, cocoa powder, and buttermilk, which add moisture and flavor. The red food coloring gives the waffles their signature look, while the cream cheese adds a delightful twist.
Using high-quality cocoa powder and pure vanilla extract will significantly enhance the flavor of your waffles. Make sure to use fresh ingredients for the best results, as they contribute to the overall taste and texture.
Essential Ingredient Notes
- All-Purpose Flour: Choose a high-quality all-purpose flour for a lighter texture. Sifting the flour before measuring can help prevent lumps and improve the consistency of the batter.
- Cocoa Powder: Using unsweetened cocoa powder ensures that you control the sweetness of the waffles. Brands like Dutch-processed cocoa provide a richer flavor and deeper color.
- Buttermilk: Buttermilk adds moisture and tenderness to the waffles. If you don’t have buttermilk, you can make a substitute by mixing milk with a little vinegar or lemon juice and letting it sit for a few minutes.
Step-by-Step Cooking Process
The cooking process for Red Velvet Marble Waffles is straightforward yet rewarding. Start by preparing the batter and cream cheese mixture separately. This ensures that each component is at the right consistency for optimal results.
Once you pour the batter into the hot waffle iron, the key is to create that beautiful marbled effect. Don’t rush this step; take your time to swirl the cream cheese in gently. The end result will be waffles that are not only delicious but also visually stunning.
Key Technique for Perfect Red Velvet Marble Waffles
The technique of swirling cream cheese into the batter is essential for achieving the marble effect. Use a knife to gently fold in the cream cheese to ensure an even distribution without overmixing. This not only enhances the visual appeal but also adds a rich flavor to each bite.
Red Velvet Marble Waffles
📋 Ingredients
Main Ingredients
- 1 cup butterRoom temperature
- 1 cup powdered sugarFor sweetness
- 2 tablespoons milkTo adjust consistency
- 1 teaspoon vanilla extractFor flavor
For the Sauce
- 2 cups all-purpose flourFor the base
- 1 cup buttermilkAdds moisture
- 1/2 cup unsweetened cocoa powderFor rich flavor
- 1/2 cup sugarFor sweetness
- 1/4 cup vegetable oilFor richness
- 2 large eggsFor binding
- 1 tablespoon red food coloringFor color
- 1 teaspoon vanilla extractFor flavor
Instructions
Prepare the Waffle Batter
In a large bowl, whisk together the all-purpose flour, cocoa powder, sugar, baking powder, and salt. In another bowl, mix the buttermilk, vegetable oil, eggs, red food coloring, and vanilla extract.
Combine Ingredients
Gradually add the wet ingredients to the dry ingredients, mixing until just combined. Do not overmix.
Prepare Cream Cheese Mixture
In a separate bowl, combine the softened cream cheese, powdered sugar, and vanilla extract. Mix until smooth and creamy.
Heat the Waffle Iron
Preheat your waffle iron and lightly coat it with cooking spray.
Pour Batter into Waffle Iron
Pour a cup of the red velvet batter onto the preheated waffle iron, then add dollops of the cream cheese mixture on top.
Create the Marble Effect
Swirl the cream cheese into the red velvet batter gently using a knife to create a marbled effect.
Cook the Waffles
Close the waffle iron and cook according to the manufacturer's instructions until the waffles are golden brown.
Serve and Enjoy
Remove the waffles from the iron and serve warm with your favorite toppings.
Recipe Notes & Tips
Storage Tips
Store any leftover waffles in an airtight container in the refrigerator for up to 3 days. To maintain the texture, reheat them in a toaster or oven before serving.
Serving Suggestions
Serve these waffles with whipped cream, fresh berries, or a sprinkle of powdered sugar. For added indulgence, drizzle with chocolate syrup or cream cheese frosting.
Recipe Variations
For a twist, try adding chocolate chips to the batter or incorporating different extracts like almond or maple. You can also create a layer of banana or strawberry slices for added flavor.