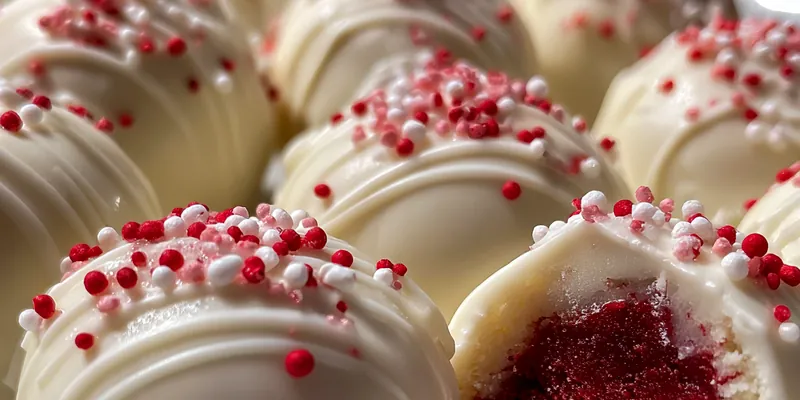
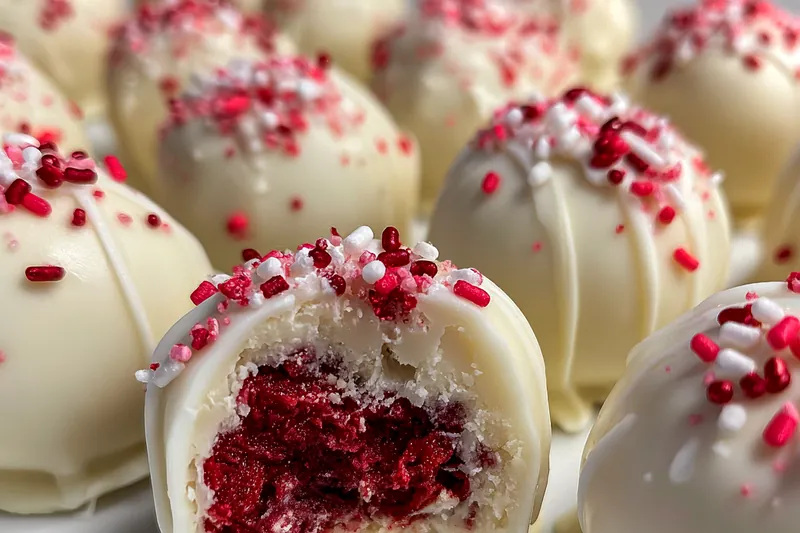
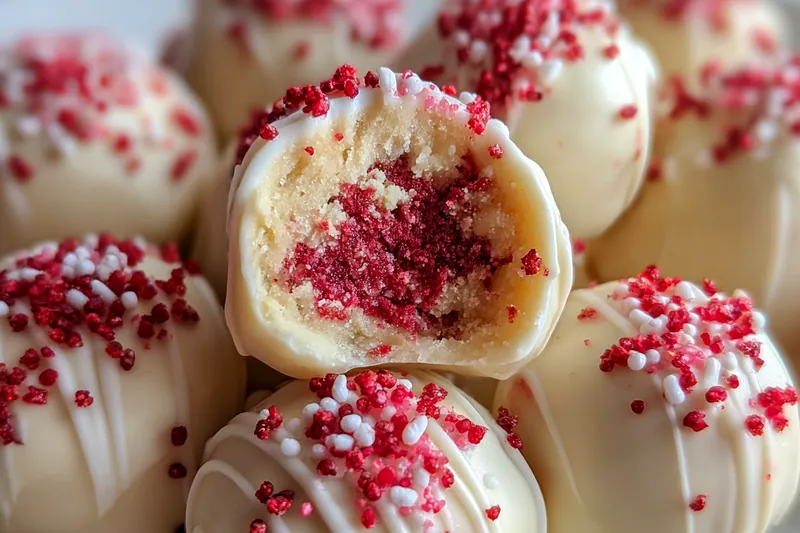
Red Velvet Cake Balls
Red Velvet Cake Balls are a delightful twist on the classic red velvet cake. These bite-sized treats are perfect for any occasion, combining the rich flavors of red velvet with a creamy frosting core. They are easy to make and are sure to impress your guests at parties or gatherings. Whether served at a birthday or a holiday celebration, these cake balls will be the star of the dessert table.

Why This Red Velvet Cake Balls Recipe Works
This recipe stands out because of its rich flavor profile and easy preparation. The combination of moist red velvet cake and creamy frosting creates a perfect bite-sized dessert. They're not only visually appealing but also incredibly delicious, making them a hit at any event.
The technique of chilling the cake balls before dipping ensures they maintain their shape and firmness. This step is crucial for achieving a smooth chocolate coating that looks as good as it tastes.
💡 Professional Tip
When melting chocolate, be sure to do it in short bursts in the microwave to avoid burning. Additionally, using a bit of shortening in the chocolate helps create a smoother consistency for coating the cake balls.
Frequently Asked Questions
Yes, you can prepare Red Velvet Cake Balls in advance. After forming the balls, you can refrigerate them for up to three days before coating them in chocolate. For longer storage, consider freezing the uncoated cake balls for up to a month and then dipping them in chocolate when ready to serve.
If you want to substitute the cream cheese frosting, you can use regular buttercream or a chocolate ganache. Just ensure it's creamy enough to hold the cake crumbs together. Alternatively, a whipped cream cheese can also work well to maintain that tangy flavor.
Red Velvet Cake Balls don't have a traditional 'done' state since they are no-bake after the initial cake is baked. The important part is ensuring the cake is baked fully and then cooling it completely before crumbling. The chilling step helps them firm up for coating.
Absolutely! You can freeze Red Velvet Cake Balls after they've been formed but before they're coated in chocolate. Place them in an airtight container or freezer bag, and they can last for about a month. Thaw them in the refrigerator before coating.
Red Velvet Cake Balls complement a variety of beverages. Serve them alongside coffee, tea, or even a glass of milk. They can also be paired with light desserts like fruit salads for a balanced treat.
In the refrigerator, Red Velvet Cake Balls can last for about 5-7 days if stored in an airtight container. Just make sure they are completely cooled and the chocolate coating is set before storing.
Yes, you can definitely make Red Velvet Cake Balls in advance. They are perfect for prepping ahead of events, as they can be stored in the fridge or freezer until you're ready to serve them.
Since Red Velvet Cake Balls are typically served cold or at room temperature, reheating is generally not necessary. If they have been refrigerated, let them sit at room temperature for about 10-15 minutes before serving for the best taste.
Recipe Troubleshooting Guide
Too Dry
Problem: If your cake balls turn out too dry, it may be due to overbaking the cake or not enough frosting.
Solution: To remedy this, make sure to monitor the baking time closely next time. If they are already made, try adding a bit more frosting to the mixture to help moisten them.
Not Crispy Enough
Problem: If the chocolate coating isn't crispy, it may be due to the chocolate not being tempered or the shortening not being mixed well.
Solution: Ensure you fully melt the chocolate and mix in the shortening thoroughly. You can also try chilling the cake balls longer before dipping them in chocolate.
Overcooked
Problem: If your cake is overcooked, it can lead to dry and crumbly cake balls.
Prevention: To prevent this, always follow the recommended baking time and test with a toothpick. If overcooked, there’s little you can do to repair them, but ensure to keep an eye on the time next time.
Undercooked Center
Problem: An undercooked center can happen if the cake wasn't baked long enough.
Recovery: Make sure to bake the cake until a toothpick comes out clean. For already made balls, store them back in the refrigerator to firm up if they feel too soft.
Burnt Exterior
Problem: If the cake has a burnt exterior, it may be due to too high an oven temperature or leaving it in too long.
Prevention: Always check the oven temperature with a thermometer and adjust if necessary. Consider lowering the temperature slightly if you're consistently having issues with burning.
Flavor Balance
Too Sweet: If your cake balls are too sweet, consider reducing the amount of frosting next time or adding a pinch of salt to balance the flavors.
Too Salty: If they taste too salty, ensure to check your ingredient measurements, especially for salt.
Bland: If the flavor is bland, try increasing the cocoa powder or vanilla extract for a richer taste.
Essential Ingredients for Red Velvet Cake Balls
The key ingredients include a quality red velvet cake mix, eggs, and cream cheese frosting. The cake mix provides the base flavor while the frosting adds moisture and richness. Using semi-sweet chocolate for coating ensures a delightful contrast to the sweet cake.
Always opt for high-quality chocolate and fresh eggs for the best results. The quality of your ingredients can significantly influence the final taste of the cake balls.
Essential Ingredient Notes
- Red Velvet Cake Mix: Choose a reputable brand of red velvet cake mix to ensure rich flavor and color. This will set the base for your cake balls, giving them that signature taste.
- Cream Cheese Frosting: Using homemade cream cheese frosting can elevate the taste of your cake balls. It’s fresher and free from preservatives, providing a creamy texture that binds the cake crumbs well.
- Chocolate Coating: When selecting chocolate for coating, opt for high-quality semi-sweet or dark chocolate for a deeper flavor. Adding shortening can help achieve a smooth coating that's easier to work with.
Step-by-Step Cooking Process
The cooking process for Red Velvet Cake Balls is straightforward and fun. By following the steps to bake the cake, crumble it, and mix it with frosting, you'll create a delicious mixture to form the cake balls. The chilling step is crucial for achieving the right texture.
Achieving perfect results means paying attention to the temperature of your ingredients and ensuring the chocolate is well melted. Each step contributes to the delightful outcome that these cake balls bring.
Key Technique for Perfect Red Velvet Cake Balls
The most important technique for making perfect Red Velvet Cake Balls is to ensure the cake is completely cooled before crumbling. This prevents the mixture from becoming too mushy and ensures that the cake balls hold their shape.
Red Velvet Cake Balls
📋 Ingredients
Main Ingredients
- 1 cup butterRoom temperature
- 1 cup heavy creamFor richness
- 1 cup powdered sugarFor sweetness
- 1 teaspoon vanilla extractFor flavor
- 2 tablespoons cocoa powderFor depth
For the Sauce
- 1 box red velvet cake mixFor the base
- 3 large eggsBinding agent
- 1 cup vegetable oilFor moisture
- 1 cup waterTo mix
- 1 cup cream cheese frostingFor richness
- 1 cup semi-sweet chocolate chipsFor coating
- 1 tablespoon cocoa powderFor flavor boost
- 2 teaspoons vanilla extractFor flavor
- 1/2 teaspoon saltTo balance flavor
- 1/2 cup powdered sugarFor sweetness
- 1 cup white chocolate chipsFor decoration
- Sprinkles for decorationOptional
- 1 tablespoon shorteningTo smooth chocolate
Instructions
Prepare the Cake
Preheat your oven to 350°F (175°C). In a large bowl, combine the red velvet cake mix, eggs, vegetable oil, and water. Mix until smooth. Pour the batter into a greased cake pan and bake for 30-35 minutes or until a toothpick comes out clean.
Cool the Cake
Once baked, remove the cake from the oven and let it cool completely in the pan for about 10 minutes, then transfer it to a wire rack to cool completely.
Crumble the Cake
After the cake has cooled, crumble it into a large bowl. You should have fine crumbs that can be easily rolled into balls.
Mix with Frosting
Add the cream cheese frosting to the crumbled cake and mix until thoroughly combined. The mixture should be moist enough to hold its shape.
Form Cake Balls
Using your hands, roll the mixture into 1-inch balls and place them on a baking sheet lined with parchment paper. Refrigerate for 30 minutes to firm them up.
Melt the Chocolate
In a microwave-safe bowl, melt the semi-sweet chocolate chips in 30-second intervals until smooth. Stir in the shortening to thin the chocolate.
Coat the Cake Balls
Dip each cake ball into the melted chocolate, allowing excess to drip off, and return to the parchment-lined baking sheet.
Decorate
Before the chocolate sets, sprinkle the top with sprinkles for decoration. Allow the chocolate to harden completely.
Recipe Notes & Tips
Storage Tips
Store Red Velvet Cake Balls in an airtight container in the refrigerator to keep them fresh. They can last up to a week. For longer storage, freeze them uncoated for up to a month.
Serving Suggestions
Serve Red Velvet Cake Balls on a decorative platter for an eye-catching presentation. They pair well with a glass of milk or your favorite dessert wine for a delightful treat.
Recipe Variations
Consider adding crushed nuts or coconut to the filling for a different texture. You can also experiment with different flavored coatings like white chocolate or colored candy melts for festive occasions.