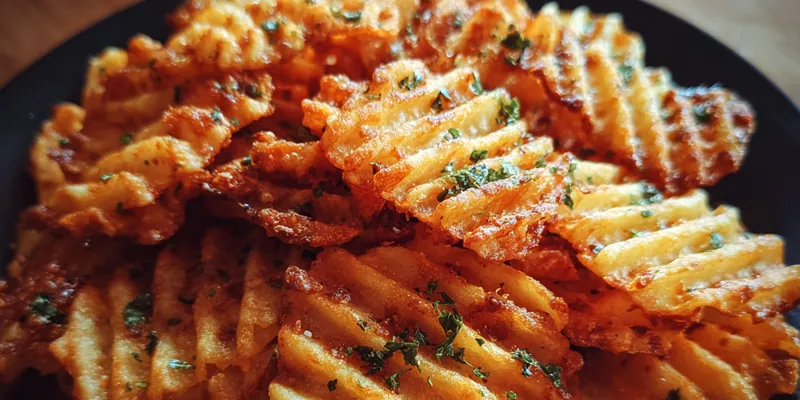
Crispy Dill Pickle Chips
Crispy Dill Pickle Chips are a fun and tasty twist on traditional pickles. Perfect for snacking, these chips are crunchy, flavorful, and incredibly easy to make. Whether you're hosting a party or looking for a satisfying snack, this recipe will not disappoint. With a delightful crunch and zesty flavor, they're sure to be a hit with family and friends!

Why This Crispy Dill Pickle Chips Recipe Works
This recipe for Crispy Dill Pickle Chips stands out due to its unique flavor profile and satisfying crunch. The combination of panko breadcrumbs and spices creates a delightful texture that enhances the pickles' natural tanginess. Each bite delivers a perfect balance of flavors, making them irresistible.
The technique of frying helps to lock in moisture while achieving a crispy exterior. By using a two-step breading process with flour and panko, these chips maintain their crunch even after cooling. This method ensures that every chip is perfectly coated for maximum flavor and enjoyment.
💡 Professional Tip
For the best results, ensure that your oil is hot enough before frying the pickles. This prevents the chips from absorbing too much oil, keeping them crispy and light. Additionally, avoid overcrowding the pan to maintain the oil temperature.
Frequently Asked Questions
Yes, you can prepare the pickle chips ahead of time and store them in an airtight container in the refrigerator. Fry them just before serving for the best texture. However, they are best enjoyed fresh for maximum crispiness.
If you don't have panko breadcrumbs, regular breadcrumbs can be used as a substitute. However, they may not provide the same level of crunch. For an alternative, crushed cornflakes or even ground pork rinds can be used for a gluten-free option.
Crispy Dill Pickle Chips are done when they turn a golden brown color and are crispy to the touch. You can also listen for a crackling sound while they fry. For even cooking, ensure that you turn them halfway through the frying process.
While it's not ideal to freeze fried pickles, you can freeze the breaded, uncooked pickle chips before frying. Place them in a single layer on a baking sheet until frozen, then transfer to a zip-top bag. When ready to eat, fry them straight from the freezer, adding a few extra minutes to the cooking time.
Crispy Dill Pickle Chips pair wonderfully with a variety of dipping sauces such as ranch, tzatziki, or spicy mustard. They make a great accompaniment to sandwiches or can be served as a standalone snack at parties.
Crispy Dill Pickle Chips are best enjoyed fresh, but they can be stored in the fridge for up to 2 days. To maintain their crispiness, reheat them in the oven or air fryer rather than the microwave.
Yes, you can prepare the breaded pickle chips in advance and store them uncooked in the refrigerator. Just fry them right before serving for the best texture. Pre-frying them may lead to sogginess.
The best way to reheat Crispy Dill Pickle Chips is in the oven or air fryer. Preheat your oven to 375°F (190°C) and bake for about 10 minutes, or until heated through and crispy again. Avoid using the microwave, as it can make them soggy.
Recipe Troubleshooting Guide
Too Dry
Problem: If the chips turn out too dry, it could be due to overcooking or not using enough buttermilk in the breading process.
Solution: To fix this, ensure you fry the chips for the right amount of time, checking for golden brown color. Additionally, you can add a bit more buttermilk when breading for added moisture.
Not Crispy Enough
Problem: If your chips aren't crispy, they may not have been fried long enough or the oil temperature may have been too low.
Solution: Make sure the oil is hot before adding the chips and fry them until they are golden brown. Consider frying in smaller batches to maintain the oil temperature.
Overcooked
Problem: If the chips are burnt or too dark, they may have been left in the oil for too long.
Prevention: Keep a close eye on the chips while frying and adjust the cooking time as needed. You can also lower the heat slightly if necessary to prevent burning.
Undercooked Center
Problem: If the chips have a raw or undercooked center, they were likely not fried long enough.
Recovery: Ensure that the oil is hot and fry the chips for the full recommended time. You can also slice them thinner to cook more evenly.
Burnt Exterior
Problem: If the exterior of the chips burns before the inside cooks, the oil may be too hot.
Prevention: Regulate the oil temperature by using a thermometer and frying at a medium heat. Adjust cooking times accordingly.
Flavor Balance
Too Sweet: If the chips are too sweet, add a pinch of salt or serve with a tangy dipping sauce to balance the flavors.
Too Salty: If they taste too salty, consider serving with a sweeter dipping sauce to offset the saltiness.
Bland: For bland chips, increase the seasoning in the panko mixture, or serve with flavored dips for added zest.
Essential Ingredients for Crispy Dill Pickle Chips
The key ingredients for this recipe include dill pickles, which provide the signature tangy flavor, and panko breadcrumbs for that extra crunch. All-purpose flour and eggs help the coating stick, while spices add depth to the flavor. High-quality ingredients will yield the best results, so choose fresh pickles and good-quality breadcrumbs.
Using fresh, crisp dill pickles will enhance the overall texture of the chips. For the panko, opt for unseasoned varieties to control the seasoning levels. Each ingredient plays a vital role in achieving the perfect crispy dill pickle chip.
Essential Ingredient Notes
- Dill Pickles: Choose crunchy dill pickles with a good balance of flavors. Look for varieties labeled as 'crunchy' or 'extra crispy' for the best texture in your chips.
- Panko Breadcrumbs: Panko breadcrumbs provide a light and airy crunch compared to regular breadcrumbs. This is key for achieving the desired texture. Consider toasting them slightly before use for added flavor.
- Spices: Feel free to experiment with the spices in the breading mixture. Adding cayenne pepper for heat or smoked paprika for a smoky flavor can create a unique twist on the classic recipe.
Step-by-Step Cooking Process
The cooking process begins with preparing your pickles and setting up a breading station. This involves flour, an egg mixture, and seasoned panko breadcrumbs, ensuring every chip is perfectly coated. Heating the oil is crucial for achieving the right crunch.
Once your pickles are breaded, fry them in small batches to maintain the temperature of the oil, allowing for an even cook. Proper frying technique is essential for getting that golden color while retaining the pickles' juicy inside.
Key Technique for Perfect Crispy Dill Pickle Chips
The secret to achieving the perfect crispy dill pickle chips lies in the double breading process and maintaining the oil temperature. This ensures a deliciously crunchy exterior while keeping the inside juicy. Frying in smaller batches allows for consistent cooking and prevents sogginess.
Crispy Dill Pickle Chips
📋 Ingredients
Main Ingredients
- 1 cup ranch dressingFor dipping
- 1/2 cup spicy mustardFor dipping
- 1/2 cup tzatziki sauceFor dipping
- 1/4 cup hot sauceOptional for added flavor
For the Sauce
- 1 lb dill pickles, slicedChoose crunchy varieties
- 1 cup all-purpose flourFor coating
- 2 large eggsBeaten for breading
- 2 cups panko breadcrumbsFor a crispy texture
- 1 tsp garlic powderFor flavor
- 1 tsp onion powderFor flavor
- 1 tsp paprikaFor flavor
- Salt to tasteFor seasoning
- Pepper to tasteFor seasoning
- 1/2 cup buttermilkFor breading
- 1/4 cup fresh dill, choppedFor garnish
- Oil for fryingUse vegetable or canola
Instructions
Prepare the Pickles
Drain the dill pickle slices and pat them dry with paper towels to remove excess moisture.
Set Up Breading Station
In one bowl, place flour. In the second bowl, whisk eggs with buttermilk. In a third bowl, mix panko breadcrumbs with garlic powder, onion powder, paprika, salt, and pepper.
Bread the Pickles
Dip each pickle slice first into the flour, then the egg mixture, and finally coat with the panko breadcrumb mixture.
Heat the Oil
In a large skillet or deep fryer, heat the oil over medium-high heat until hot.
Fry the Pickles
Carefully add the breaded pickle chips to the hot oil in batches, frying until golden brown, about 3-4 minutes per side.
Drain the Chips
Use a slotted spoon to transfer the fried pickle chips to a plate lined with paper towels to drain excess oil.
Garnish and Serve
Sprinkle the fried pickle chips with fresh dill and serve warm with your favorite dipping sauce.
Enjoy!
Delight in your crispy dill pickle chips as a perfect snack or appetizer!
Recipe Notes & Tips
Storage Tips
To store Crispy Dill Pickle Chips, place them in an airtight container. They can last up to 2 days in the refrigerator. For best results, reheat in the oven to regain their crispiness.
Serving Suggestions
Serve Crispy Dill Pickle Chips alongside various dipping sauces like ranch or spicy mustard. They make a fantastic appetizer or snack for game day or gatherings.
Recipe Variations
For a different twist, try adding different spices to the breadcrumb mixture or incorporate herbs like oregano or thyme. You can also experiment with different dipping sauces for added flavor.