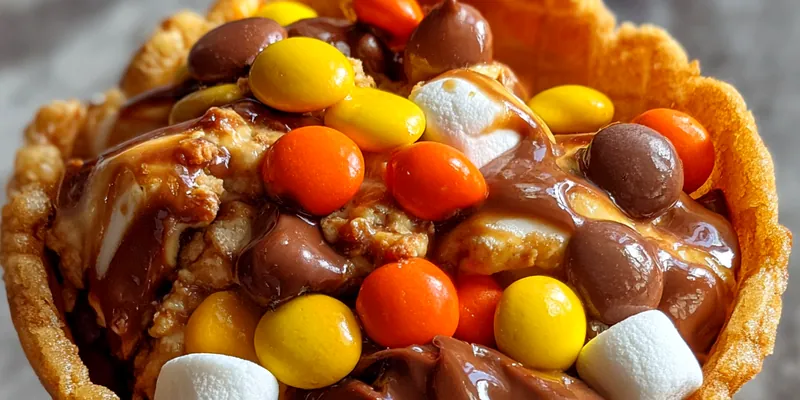
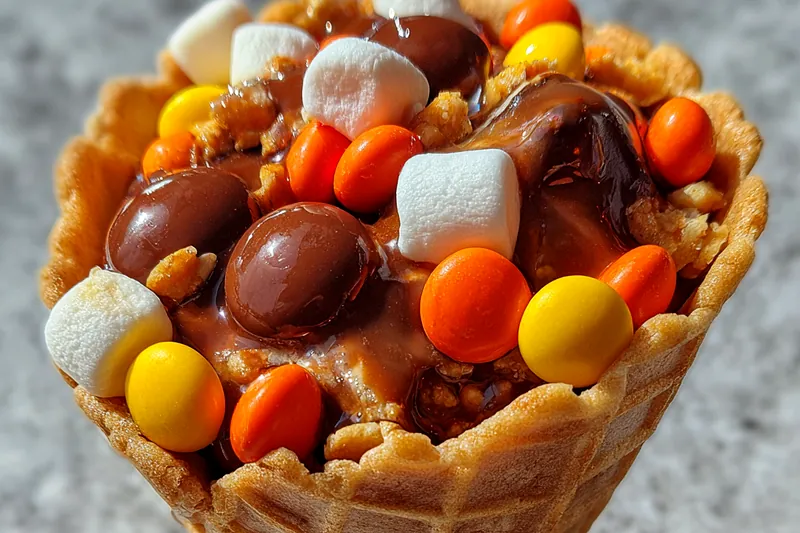
Chocolate Candy Waffle Cones
Chocolate Candy Waffle Cones are a deliciously sweet treat that combine the crunch of a waffle cone with rich chocolate and colorful candy. Perfect for any occasion, these cones are sure to please both kids and adults alike. With a simple recipe and delightful results, they make for a fantastic snack or dessert. Enjoy them as they are or pair them with your favorite ice cream!

Why This Chocolate Candy Waffle Cones Recipe Works
This recipe for Chocolate Candy Waffle Cones works because it combines the beloved elements of crunchy cones with rich chocolate and sweet candy. The balance of textures and flavors creates a delightful experience in every bite. Not only are they visually appealing, but they also satisfy your sweet tooth cravings.
The technique of making the cones in a waffle maker ensures even cooking and a perfect crispness. By filling them with a mixture of candies and chocolate, you can customize each cone to your liking, making them a versatile treat that's sure to impress.
💡 Professional Tip
For the best results, be sure to fully preheat your waffle cone maker before pouring in the batter. This ensures that the cones cook evenly and become crispy. Additionally, experiment with different types of chocolate and candy for a unique twist on the classic recipe!
Frequently Asked Questions
Yes, you can make the waffle cones ahead of time and store them in an airtight container. This will keep them fresh for a few days. However, it is best to fill them with the chocolate and candy mixture close to serving time to ensure they remain crispy.
If you don't have cocoa powder, you can use carob powder as a substitute in equal amounts. Alternatively, you could also use a combination of dark chocolate melted down instead of cocoa powder, but you may need to adjust the sugar in the recipe accordingly.
The waffle cones are done when they are golden brown and crispy to the touch. You should also hear a slight crunch when you remove them from the waffle maker. If they feel soft or pliable, they need more time to cook.
Yes, you can freeze the waffle cones before filling them. Just be sure to wrap them tightly in plastic wrap or place them in an airtight container. However, filled cones may not freeze well, as the candy and chocolate can alter in texture.
Chocolate Candy Waffle Cones are delicious on their own, but they pair well with ice cream, whipped cream, or a drizzle of chocolate sauce. You can also serve them alongside fresh fruit for a refreshing contrast!
When stored in an airtight container, Chocolate Candy Waffle Cones can last for up to 3 days in the refrigerator. However, they are best enjoyed fresh to maintain their crispiness.
Yes, you can prepare the waffle cones in advance and store them in a cool, dry place. Just remember to fill them with chocolate and candies shortly before serving to keep them from getting soggy.
To reheat the waffle cones, place them in a preheated oven at 350°F (175°C) for about 5 minutes. This will help restore their crispiness without overcooking them.
Recipe Troubleshooting Guide
Too Dry
Problem: If the waffle cones turn out dry, it's often due to overcooking.
Solution: Reduce the cooking time slightly and ensure you are measuring the ingredients accurately to maintain the right moisture balance in the batter.
Not Crispy Enough
Problem: Waffle cones that are not crispy can result from undercooking.
Solution: Make sure the waffle cone maker is fully preheated and allow the cones to cook until they reach a golden-brown color.
Overcooked
Problem: Overcooked cones can become too hard or brittle.
Prevention: To prevent this, watch the cooking time closely and remove the cones as soon as they are golden brown. Testing with one cone first can help gauge the timing.
Undercooked Center
Problem: If the centers of the cones are uncooked, the batter may be too thick or unevenly distributed.
Recovery: Make sure to spread the batter evenly and check that your waffle cone maker is heating properly.
Burnt Exterior
Problem: Burnt exterior occurs when the cones are left in the waffle maker for too long.
Prevention: Keep an eye on the cooking time, and adjust the temperature settings if necessary to achieve a better result.
Flavor Balance
Too Sweet: If the cones are too sweet, balance the flavor with a pinch of salt in the batter.
Too Salty: For cones that are too salty, adding a bit more sugar to the batter can help balance the flavors.
Bland: If the flavor is bland, add a teaspoon of vanilla extract or other flavorings to enhance the taste.
Essential Ingredients for Chocolate Candy Waffle Cones
The key ingredients, like cocoa powder and chocolate chips, provide the rich chocolate flavor that makes these cones irresistible. Fresh, high-quality ingredients will enhance the overall taste and texture of the cones.
Using good quality chocolate and candies can make a significant difference in the flavor profile. It's worth investing in premium brands to truly elevate this treat.
Essential Ingredient Notes
- Cocoa Powder: Opt for unsweetened cocoa powder for the best chocolate flavor without added sugar. Dutch-processed cocoa can also provide a deeper color and flavor, enhancing your cones.
- Chocolate Chips: Use semi-sweet or dark chocolate chips for a richer flavor. You can also mix in white chocolate chips for contrast and added sweetness.
- Assorted Candy: Feel free to get creative with the candy you include! From gummy bears to crushed cookies, the variety adds color and fun to your waffle cones.

Step-by-Step Cooking Process
The cooking process for Chocolate Candy Waffle Cones is straightforward and rewarding. You'll start by preparing the batter, then cook it in a waffle cone maker, shaping the cones as they come out hot.
To achieve perfect results, be sure to preheat your waffle cone maker. This ensures that each cone cooks evenly and maintains a delightful crispness that complements the sweet filling.
Key Technique for Perfect Chocolate Candy Waffle Cones
The most important technique is ensuring that your waffle cone maker is properly preheated. This step is crucial for achieving that signature crispy texture. Also, shaping the cones while they're hot allows them to set perfectly.
Chocolate Candy Waffle Cones
📋 Ingredients
Main Ingredients
- 1 cup butterRoom temperature
- 1/2 cup heavy creamFor creamy texture
- 1 cup chocolate chipsMelted for sauce
- 1/4 cup powdered sugarFor sweetness
- 1 tsp vanilla extractFor flavor
For the Sauce
- 2 cups all-purpose flourEssential for structure
- 1 cup cocoa powderFor chocolate flavor
- 1 cup sugarFor sweetness
- 1/2 cup unsalted butter, meltedAdds richness
- 1 cup milkFor moisture
- 2 large eggsBind ingredients
- 1 tsp vanilla extractFor flavor
- 1/2 tsp saltEnhances flavor
Instructions
Prepare the Batter
In a large mixing bowl, combine the flour, cocoa powder, sugar, and salt. In another bowl, whisk together the melted butter, milk, eggs, and vanilla extract. Gradually add the wet ingredients to the dry ingredients, stirring until smooth.
Preheat Waffle Cone Maker
Preheat your waffle cone maker according to the manufacturer's instructions.
Cook Waffle Cones
Pour a ladleful of batter onto the center of the preheated waffle cone maker. Close the lid and cook for about 2-3 minutes, or until the cone is crispy.
Shape the Cones
Carefully remove the waffle from the maker and immediately shape it into a cone. Hold the cone shape for a few seconds to allow it to set.
Repeat the Process
Continue cooking and shaping the remaining batter into cones, placing them on a wire rack to cool.
Prepare the Filling
In a mixing bowl, combine chocolate chips and candy pieces. Mix well to distribute evenly.
Fill the Cones
Once cones are completely cool, fill each cone with the chocolate and candy mixture.
Serve and Enjoy
Serve your chocolate candy waffle cones immediately, or place them in the refrigerator until ready to enjoy.
Recipe Notes & Tips
Storage Tips
Store your Chocolate Candy Waffle Cones in an airtight container at room temperature to keep them crispy. Avoid refrigerating them, as this can lead to sogginess. They are best enjoyed within a few days of making.
Serving Suggestions
Serve Chocolate Candy Waffle Cones as a fun dessert at parties, or enjoy them as a quick snack. Pair them with a scoop of ice cream or drizzle with chocolate sauce for an extra indulgence.
Recipe Variations
Feel free to experiment with different types of chocolates and candies for filling. You can also add a scoop of ice cream to each cone for a delightful sundae experience!