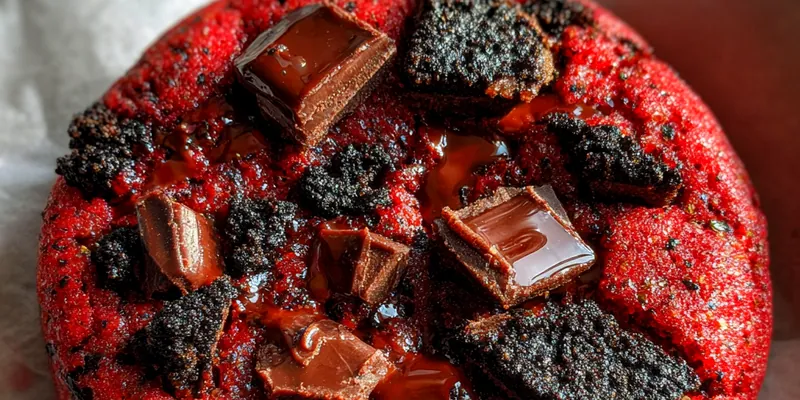
Chewy Red Velvet Oreo Cookies
These Chewy Red Velvet Oreo Cookies are a delightful blend of rich red velvet flavor and the classic crunch of Oreos. Perfect for any occasion, they're sure to impress your family and friends. The cookies are soft, chewy, and packed with chocolatey goodness. Indulge in this unique dessert that combines two favorites into one delicious treat.

Why This Chewy Red Velvet Oreo Cookies Recipe Works
This recipe combines the rich flavor of red velvet with the delightful crunch of Oreo cookies, making for a uniquely satisfying treat. The dough remains chewy and soft, thanks to the right balance of wet and dry ingredients. Moreover, using both white and brown sugar enhances the flavor and texture, creating a cookie that is both sweet and slightly caramelized.
The technique of creaming the butter and sugars properly ensures that air is incorporated, providing a light texture. Adding the dry ingredients gradually prevents overmixing, which can lead to tough cookies. Finally, underbaking the cookies slightly allows them to maintain their chewy center while the edges set perfectly.
💡 Professional Tip
For the best results, make sure your butter is at room temperature before creaming it with the sugars. This helps to incorporate air into the mixture, resulting in lighter cookies. Additionally, don’t overbake the cookies; they should be slightly underdone in the center for that perfect chewy texture.
Frequently Asked Questions
Absolutely! You can prepare the cookie dough in advance and refrigerate it for up to 3 days. Just scoop the dough onto a baking sheet, wrap it tightly, and store it in the fridge. When you are ready to bake, simply let the dough sit at room temperature for about 15 minutes before baking.
If you're looking for a butter substitute, you can use margarine or a plant-based butter alternative. This will help maintain the moisture and richness of the cookies. Additionally, if you're dairy-free, coconut oil can also work well, but be aware it may impart a mild coconut flavor to the cookies.
A good indicator that your cookies are done is when the edges look set and the centers appear slightly underbaked. They will continue to firm up as they cool on the baking sheet. If they look too soft, you can always bake them for an additional minute or two, but be careful not to overbake.
Yes, these cookies freeze beautifully! To freeze, allow them to cool completely, then place them in an airtight container or freezer bag. They can be stored for up to 3 months. When you're ready to enjoy them, simply thaw at room temperature or warm them in the microwave for a few seconds.
These cookies pair wonderfully with a glass of cold milk or a scoop of vanilla ice cream for a delightful dessert experience. You could also serve them alongside coffee or hot chocolate for a cozy treat. For a festive touch, consider adding whipped cream and a drizzle of chocolate sauce on top.
When stored in an airtight container in the fridge, these cookies will stay fresh for up to one week. Make sure to separate layers of cookies with parchment paper to prevent them from sticking together.
Definitely! You can prepare the dough in advance and keep it in the fridge for up to 3 days. Alternatively, you can bake the cookies and store them in an airtight container for up to a week. Just make sure to allow them to cool completely before sealing them to maintain their freshness.
To reheat your cookies, preheat your oven to 350°F (175°C) and place them on a baking sheet. Heat for about 5-7 minutes or until warmed through. Alternatively, you can use the microwave for 10-15 seconds for a quick warm-up, but be careful not to overheat as they may become tough.
Recipe Troubleshooting Guide
Too Dry
Problem: If your cookies come out dry, it may be due to too much flour or overbaking.
Solution: Make sure to measure your flour accurately and avoid packing it into the measuring cup. Also, keep an eye on the baking time to prevent overbaking.
Not Crispy Enough
Problem: If your cookies are soft and not as crispy as desired, they may need more baking time.
Solution: Try baking them for an additional minute or two. You can also slightly reduce the amount of brown sugar in the recipe to achieve a firmer texture.
Overcooked
Problem: If the cookies are hard and overcooked, this can happen due to excessive baking time.
Prevention: To prevent overcooking, set a timer and check the cookies a couple of minutes before the recommended time. Remove them from the oven when they are slightly underbaked.
Undercooked Center
Problem: If the cookies have a wet center, they might have been taken out of the oven too soon.
Recovery: If you find that they are undercooked, return them to the oven for another minute or two to allow the centers to set.
Burnt Exterior
Problem: Burning around the edges can occur if the oven temperature is too high.
Prevention: Make sure to check your oven temperature with a thermometer and adjust accordingly. You might want to lower the temperature and bake for a longer period.
Flavor Balance
Too Sweet: If the cookies are too sweet, consider reducing the sugar next time or adding a pinch of salt to enhance the flavor balance.
Too Salty: If they are too salty, check to ensure that you correctly measured the salt and other ingredients. You can fix this by adding a bit of extra sugar to balance it out.
Bland: For bland cookies, increase the vanilla extract or add a touch of cocoa powder to enhance the chocolate flavor.
Essential Ingredients for Chewy Red Velvet Oreo Cookies
The key ingredients for these cookies include all-purpose flour, cocoa powder, and butter. Each component plays an integral role in creating the perfect texture and flavor. The cocoa powder adds a rich chocolate taste, while the butter provides moisture and richness.
Using high-quality ingredients is crucial for the best flavor. Opt for real unsweetened cocoa powder and fresh butter for the best results. This will ensure your cookies have a deep, rich flavor and a soft, chewy texture.
Essential Ingredient Notes
- All-Purpose Flour: When measuring flour, use the spoon and level method to prevent adding too much. This will help achieve the perfect cookie texture.
- Cocoa Powder: For the best flavor, use high-quality Dutch-processed cocoa powder. It will give your cookies a deeper chocolate flavor.
- Red Food Coloring: Use gel food coloring for a more vibrant red hue without adding too much liquid to the dough. This ensures the right consistency.
Step-by-Step Cooking Process
Making these cookies is a straightforward process that involves mixing, baking, and cooling. It’s essential to follow the steps closely to achieve the perfect chewy texture. The combination of creaming the butter and sugars ensures a fluffy base before adding the dry ingredients.
Achieving perfect results relies on proper mixing and baking times. Be sure to monitor the cookies as they bake, and allow them to cool on the baking sheet to set properly. This method ensures you get a soft and chewy cookie every time.
Key Technique for Perfect Chewy Red Velvet Oreo Cookies
The most important technique in this recipe is the creaming of butter and sugars. This process incorporates air into the mixture, creating a light and fluffy cookie base. Additionally, the key is to not overmix after adding the flour mixture, as this can lead to a dense cookie. Keep it gentle and just mix until combined for the best results.
Chewy Red Velvet Oreo Cookies
📋 Ingredients
Main Ingredients
- 1 cup butterRoom temperature
- 1 cup sugarGranulated
- 2 cups all-purpose flourSifted
- 1 cup cocoa powderUnsweetened
- 2 large eggsRoom temperature
- 1 tablespoon red food coloringGel preferred
For the Sauce
- 1 cup brown sugarPacked
- 1 teaspoon vanilla extractPure
- 1 teaspoon baking sodaBaking agent
- 1/2 teaspoon saltFor balance
- 1 cup chocolate chipsSemi-sweet
- 1 package Oreo cookiesCrushed
- 1/2 cup powdered sugarFor dusting
Instructions
Preheat Oven
Preheat your oven to 350°F (175°C). Line a baking sheet with parchment paper.
Mix Dry Ingredients
In a bowl, whisk together the flour, cocoa powder, baking soda, and salt. Set aside.
Cream Butter and Sugars
In a large mixing bowl, cream the softened butter, sugar, and brown sugar until light and fluffy.
Add Eggs and Flavoring
Add eggs, red food coloring, and vanilla extract to the butter mixture. Mix until combined.
Combine Wet and Dry Ingredients
Gradually add the dry ingredients to the wet mixture, mixing until just combined.
Fold in the Chocolate Chips and Oreos
Gently fold in the chocolate chips and crushed Oreo cookies.
Shape Cookies
Using a cookie scoop, drop dough onto the prepared baking sheet, spacing them about 2 inches apart.
Bake
Bake in the preheated oven for 12-15 minutes or until the edges are set but the centers are still soft.
Cool and Dust
Allow cookies to cool on the baking sheet for 5 minutes before transferring to a wire rack. Dust with powdered sugar if desired.
Recipe Notes & Tips
Storage Tips
To keep your cookies fresh, store them in an airtight container at room temperature. If you want to extend their freshness, you can refrigerate them, but they may lose some of their chewy texture. For longer storage, freeze the cookies in a container for up to three months.
Serving Suggestions
Serve your Chewy Red Velvet Oreo Cookies fresh out of the oven with a glass of cold milk or alongside a scoop of ice cream. They make for a perfect dessert for parties or holidays and can be garnished with whipped cream for an added touch.
Recipe Variations
Feel free to experiment by adding nuts like walnuts or pecans for an added crunch. You can also substitute white chocolate chips for a different flavor profile or adjust the level of cocoa for a richer chocolate cookie.